I would like to share a simple way of creating a ChatBot application using ChatGPT REST API in Flutter. First I will show you how to create a simple chat application using Flutter and then show you how to integrate ChatGPT with the chat app in an easy way to create ChatBot.
ChatGPT
ChatGPT, which stands for Chat Generative Pre-trained Transformer, is a large language model-based chatbot developed by OpenAI and launched on November 30, 2022, notable for enabling users to refine and steer a conversation towards a desired length, format, style, level of detail, and language used. Successive prompts and replies, known as prompt engineering, are considered at each conversation stage as a context
Why Flutter?
Flutter is an open-source UI software development kit created by Google. It is used to develop cross-platform applications from a single codebase for any web browser, Fuchsia, Android, iOS, Linux, macOS, and Windows. And it’s easy to create cross-platform applications in a short period of time.
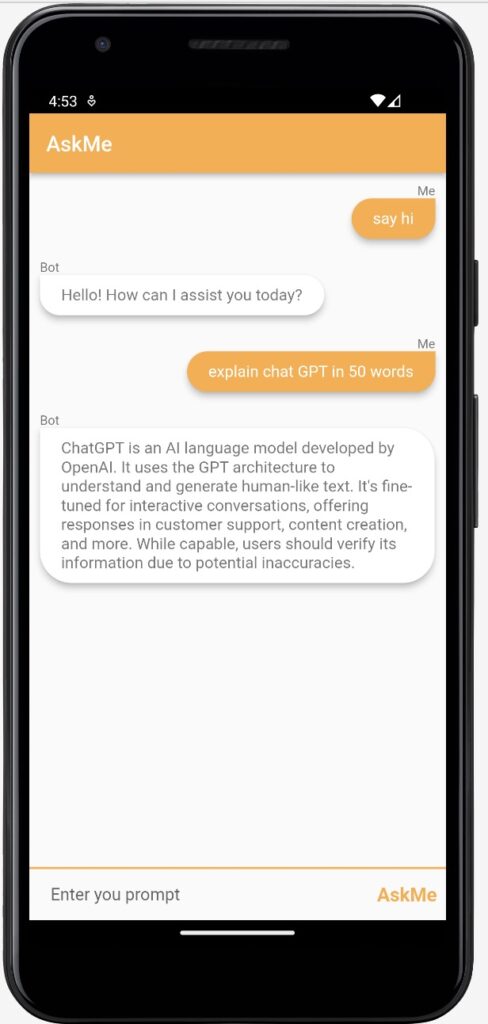
Chat Application using Flutter
Let’s break down the design of the Chat Application to understand how to approach or develop this application using Flutter Widgets. If you look at the Chat screen it resembles the UI of list view. So let’s create a Chat UI using listview widgets.
Also using a TextField widget to enter the prompt for the ChatGPT input.
Creating a Column widget to hold a list view for chat and textfield for prompt text. Use the Expanded widget to fit the chat UI in all kinds of screen sizes as shown below.
Column(
          mainAxisAlignment: MainAxisAlignment.spaceBetween,
          crossAxisAlignment: CrossAxisAlignment.stretch,
          children: <Widget>[
            AMMessageListView(
              messageBubbles: messageBubbles,
              showSpinner: showLoading,
            ),
            Container(
              decoration: kMessageContainerDecoration,
              child: Row(
                crossAxisAlignment: CrossAxisAlignment.center,
                children: <Widget>[
                  Expanded(
                    child: TextField(
                      controller: messageTextController,
                      onChanged: (value) {
                        messageText = value;
                      },
                      decoration: kMessageTextFieldDecoration,
                    ),
                  ),
                  TextButton(
                    onPressed: () async {
                      if (messageText.length == 0) {
                        Fluttertoast.showToast(msg: 'Kindly enter the promt');
                        return;
                      } else {
                        setUpMessages();
                      }
                    },
                    child: Text(
                      'AskMe',
                      style: kSendButtonTextStyle,
                    ),
                  ),
                ],
              ),
            ),
          ],
Let’s create the Bubble UI which is represented as a message element view. I’m making a simple bubble view as shown below which returns Padding as a widget of a Stateless widget.
Padding(
      padding: EdgeInsets.all(10.0),
      child: Column(
        crossAxisAlignment:
        isMe ? CrossAxisAlignment.end : CrossAxisAlignment.start,
        children: <Widget>[
          Text(
            sender,
            style: TextStyle(
              fontSize: 12.0,
              color: Colors.black54,
            ),
          ),
          Material(
            borderRadius: isMe
                ? BorderRadius.only(
                topLeft: Radius.circular(30.0),
                bottomLeft: Radius.circular(30.0),
                bottomRight: Radius.circular(30.0))
                : BorderRadius.only(
              bottomLeft: Radius.circular(30.0),
              bottomRight: Radius.circular(30.0),
              topRight: Radius.circular(30.0),
            ),
            elevation: 5.0,
            color: isMe ? Colors.orangeAccent : Colors.white,
            child: Padding(
              padding: EdgeInsets.symmetric(vertical: 10.0, horizontal: 20.0),
              child: Text(
                text,
                style: TextStyle(
                  color: isMe ? Colors.white : Colors.black54,
                  fontSize: 15.0,
                ),
              ),
            ),
          ),
        ],
      ),
    );
Creating Message List view setup as AMMessageListView and returns an Expanded widget for the listview to operate. I have used CircularProgressIndicator to indicate the network activity of the ChatGPT which will shown and hide accordingly during network calls.
Expanded(child: Container(
  child: Column(
    crossAxisAlignment: CrossAxisAlignment.stretch,
    children: [
      Container(height:showSpinner?40:0,
        child: Center(
          child: CircularProgressIndicator(
            color: Colors.orangeAccent,
          ),
        ),
      ),
      Expanded(child: ListView(
        children:messageBubbles,
      ),)
    ],
  ),
));
Integrating ChatGPT with Flutter for creating ChatBot
I’m using http plugins for making ChatGPT REST API calls. I’ll be using OpenAI’s REST API to make any prompt request. Kindly refer to OpenAI documentation for more details. Create an account in OpenAI to use this service. Once created generate an API key to use in this sample project. Now make the API as mentioned below
class AMNetworkManager{
  Future getCompletion({required String text}) async {
    var client = http.Client();
    try {
      final theUri = Uri.https('api.openai.com', 'v1/chat/completions');
      print('The Request URL: ${theUri}');
      var headers = {
        'Authorization': 'Bearer $kChatGPTKey',
        'Content-Type': 'application/json'
      };
      List<dynamic> queryData = [{'role': 'user', 'content':'${text}'}];
      var theBody = json.encode({'model':'gpt-3.5-turbo', 'temperature' : '0.7', 'messages' : queryData});
      print('Request body $theBody');
      var response = await http.post(theUri,headers: headers, body:theBody);
      print('Response status: ${response.statusCode}');
      return jsonDecode(response.body);
    } catch (e) {
      print('some error $e');
      return null;
    } finally {
      client.close();
    }
  }
}
Now call getCompletion of AMNetworkManager while the user enters any prompt. And display the response as a Bot response in the Chat UI. I have created a flag to determine is a message by me or others. This flag will be used to create respective bubbles for the chat UI. I’m using the setState method to update the UI whenever there is a change in the data set. In this case array of bubble views. The idea is to create a new bubble view for any new prompt and update the messageBubbles array in setState to update the UI.
void setUpMessages() async {
    final messageBubble = AMMessageBubble(
      sender: 'Me',
      text: messageText,
      isMe: true,
    );
    setState(() {
      showLoading = true;
      messageBubbles.add(messageBubble);
    });
    messageTextController.clear();
    FocusManager.instance.primaryFocus?.unfocus();

    AMNetworkManager theAMNetworkMgr = AMNetworkManager();
    var res = await theAMNetworkMgr.getCompletion(text: messageText);
    String theResult = '';
    print('The response data: ${res}');
    if (res['choices'] != null) {
      var thePromtData = res['choices'];
      thePromtData = thePromtData[0];
      theResult = thePromtData['message']['content'];
    } else if (res['error'] != null) {
      theResult = res['error']['message'];
    }
    print('Msg from ChatGPT: ${theResult}');
    final responseBubble = AMMessageBubble(
      sender: 'Bot',
      text: theResult,
      isMe: false,
    );
    setState(() {
      showLoading = false;
      messageBubbles.add(responseBubble);
    });
    messageText = '';
  }
Now run the app to make the request to your own ChatBot application.
I have added a fully working project for anyone to try this ChatBot application. Just add your OpenAI API key for kChatGPTKey under AMConstants class and run the project either on an Android or in an iOS device to enjoy this feature.
https://github.com/fareethjohn/AskMe
Happy coding…..
Written By

I’m an Enterprise Architect at Akamai Technologies with over 15 years of experience in mobile app development across iOS, Android, Flutter, and cross-platform frameworks. I’ve built and launched 45+ apps on the App Store and Play Store, working with technologies like AR/VR, OTT, and IoT.
My core strengths include solution architecture, backend integration, cloud computing, CDN, CI/CD, and mobile security, including Frida-based pentesting and vulnerability analysis.
In the AI/ML space, I’ve worked on recommendation systems, NLP, LLM fine-tuning, and RAG-based applications. I’m currently focused on Agentic AI frameworks like LangGraph, LangChain, MCP and multi-agent LLMs to automate tasks